En esta página
Webhook Configuration
Complete guide to create webhooks and connect them with your TradingView alerts.
What is a Webhook?
A webhook is equivalent to an alert configured in TradingView. Each webhook you create will receive signals from a single TradingView alert. It's important to understand that one webhook = one alert.
Once the webhook is created, you can connect it to multiple MT5 accounts through the Connection Editor, allowing you to distribute signals from that alert to different brokers or accounts.
Create a Webhook
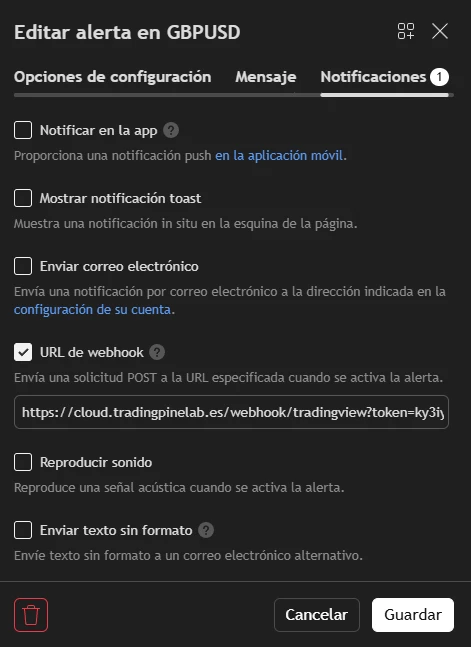
On the webhook page you will find a button to copy the URL. This is the destination where TradingView should send the signal. You must copy it and paste it in the "Webhook URL" field of the "Notifications" section of the alert you are creating in TradingView.
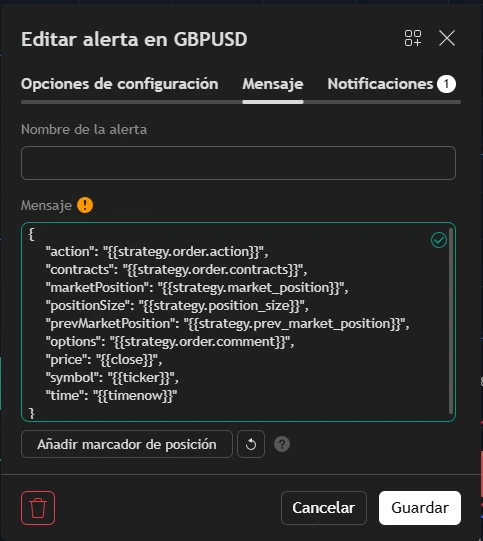
On the webhook page you will find a button to copy the JSON. This is the message that TradingView should send. You must copy it and paste it replacing all content in the "Message" field of the "Message" section of the alert you are creating in TradingView.
Do not change this JSON. If you want optional take profit or stop loss, your strategy must put them in the order comment (see below)—not here.
Configure in TradingView
Optional take profit and stop loss (from your strategy)
In most cases you do not need to change your strategy code or the webhook JSON for take profit and stop loss to work. Your strategy already defines when to open and when to close. When price hits the TP or SL from the strategy logic, TradingView sends a close alert; we receive it and your account executes the close. That is why you usually won't see TP/SL lines on the MetaTrader position: the exit happens when that alert arrives, not because those levels were stored on the broker ticket. That is normal and expected—not a mistake.
So the extra feature on this page is optional. Use it only if you want TP and SL to appear on the MT5 order (e.g. prop firm rules, checks, or personal taste). Same idea of execution—just visible levels on the ticket.
- TP/SL in the JSON? No—leave the alert message as we provide it.
- If a close alert arrives but the position is already closed, we do nothing—no problem.
If you do want broker-style TP/SL on the MetaTrader order, you can send levels with each signal without editing the webhook JSON. Your strategy must add a fixed text block in the order comment when it opens (or adjusts) a trade. TradingView forwards that comment automatically. Details below.
- Default path: no code changes—TP/SL close via TradingView alerts.
- Keep the alert Message (JSON) exactly as we give you.
- Only if you want TP/SL on the MT5 ticket: add the block below in your strategy's order comment.
Put this block inside the order comment (you may add your own words before or after; keep the braces and spelling exact):
{TradingPineLab:tp=X,sl=X,applyOptionsToAllOrders=false}- tp (optional) — TP price to set on the order.
- sl (optional) — SL price to set on the order.
- applyOptionsToAllOrders (optional, default
false) — Iffalse, TP/SL apply only to the order executed by that signal. Iftrue, all open positions for the same strategy (same webhook / symbol) are updated to the same TP/SL.
For a single entry you can send for example:
{TradingPineLab:tp=123.45,sl=122.10}If you edit your strategy in TradingView (Pine Script), a typical pattern is: compute prices, then pass them in comment=. Use commas between tp, sl and applyOptionsToAllOrders:
tempTP = close + (close * 0.01)
tempSL = close - (close * 0.01)
strategy.entry('Bull #1', strategy.long, qty = baseOrderSize, comment = 'Compra TEST {TradingPineLab:tp=' + str.tostring(tempTP) + ',sl=' + str.tostring(tempSL) + ',applyOptionsToAllOrders=true}')
Valid examples:
{TradingPineLab:tp=1.2345,sl=1.2300,applyOptionsToAllOrders=true}
{TradingPineLab:tp=1.2345,applyOptionsToAllOrders=false}
{TradingPineLab:sl=1.2300,applyOptionsToAllOrders=true}
{TradingPineLab:tp=123.45,sl=122.10}Indicator alerts (plain text)
If your signal comes from an indicator (not a strategy), TradingView does not send strategy variables. In that case the alert message must be a single line of plain text—not JSON. The webhook URL is the same as always (copy it from your webhook in TPL Cloud).
In TradingView: create an alert on your indicator, enable Webhook URL, paste your TPL Cloud URL, and in Message write only the line below (you can use Pine placeholders such as {{close}} inside values if your script exposes them).
Message format
action,symbol,qty=X,sl=Y,tp=Z- action — Required.
buy= open a buy market order;sell= open a sell market order;close= close position(s) for that symbol. - symbol — Required. The ticker from your chart (e.g.
EURUSD). The Connection Editor can map it to your broker’s symbol. - qty — Required for
buyandsell(volume in lots). Forclose: omit for a full close; set a value for a partial close (if it is greater than or equal to open volume, everything is closed). - sl / tp — Optional. Only used on
buyandsell. Supported formats:20p— distance in pips from the entry price1.5%— percentage of the current price@1.08250— fixed price
Examples
buy,EURUSD,qty=0.10,sl=20p,tp=40p
sell,BTCUSD,qty=0.01,sl=1%,tp=2%
buy,XAUUSD,qty=0.05,sl=@3210.5,tp=@3260.0
close,EURUSD
close,EURUSD,qty=0.05Connect Webhook with Accounts
Once the webhook is created, you need to connect it with your MT5 accounts. This is done in the Connection Editor:
- Go to the Connection Editor
- Drag the webhook from the left list to the canvas
- Drag an MT5 account to the canvas
- Connect them to create a Mapping between both
- Configure the symbol in the mapping. This symbol will be the one used by the connected account
- Save the connection
Troubleshooting
- Verify that the webhook URL is correct
- Check that the alert is active in TradingView
- Verify that the webhook is connected to an account in the Connection Editor
- Make sure to use the exact example JSON we provide
- Do not modify the Pine Script variables ({{strategy.order.action}}, etc.)
- Verify that all quotes are properly closed